


Introduction
Hello AI Enthusiast!!!
In this post we will learn to code to extract the embedding of an image and use that embedding to search the matching images for a particular test image.
Embeddings are an equivalent representation for specific data in new feature dimensions. The new dimensions may not be comprehensible to human but it works great in separating distinct image and grouping similar images together.
You may check our previous blog on Embeddings i.e. Here and Here. Though these blogs were written for word embedding but the concept remains the same for Image/visual embedding too.
In very simple terms, we are grouping similar images together.
Similar idea was discussed in the Deep Learning course by Stanford Here. Below is an image from the course. Images were plotted using their embeddings.
We will not plot the image as done in the above post but we will use a similar approach to find the matching best "N" images.
Approach
How can we achieve this task,
Simply getting the euclidean distance between pixels
This approach will not work because we need something which is invariance to translation and if possible to rotation too. Pixel to pixel comparison will expect similar feature representation by the same pixel for each image. Another reason is that a raw image will have a very high dimensionality which will impact the euclidean distance formula.Our approach
This is a standard approach for such a task. The steps go as,- Get the feature vector of all the training images using a pre-trained CNN model
- These are the visual embedding for the images
- Get the visual embedding of our search image
- Find the nearest "N" images from the training dataset
- These are the search results
Let's code it
Download the dataset
We will use Caltech_101 dataset. Below is the description for the dataset from the official website Link.
Pictures of objects belonging to 101 categories. About 40 to 800 images per category. Most categories have about 50 images. Collected in September 2003 by Fei-Fei Li, Marco Andreetto, and Marc 'Aurelio Ranzato. The size of each image is roughly 300 x 200 pixels
%%bash
# One time code
tar_path = '/content/<<full_path>>/101_ObjectCategories.tar.gz'

tar -xvzf "$tar_path" -C '/content'

ls -l '/content/data' | head -5
Code-explanation
%%bash - We are doing all our code in Google Colab. It also supports magic cell concept. With %%bash, we can use Linux command directly in the Colab cell.
All other parts of the code is quite trivial and self-explanatory.
import shutil, os, sys

path="/content/101_ObjectCategories"
dest = "/content/all_images"

for root, dirs, files in os.walk(path): #1
    for dir in dirs:
        for filename in os.listdir(root+"/"+dir):
            #spl = root.split("/"); newname = spl[-1]; sup = ("/").join(spl[:-1])
            shutil.move(root+"/"+dir+"/"+filename, dest+"/"+dir+"_"+filename)

all_images = ["/content/all_images/"+elem for elem in os.listdir(dest)]    #2
Code-explanation
#1 - The images are placed in 101 separate sub-dirs. We are looping on each and placing all the images in a common dir i.e. dest
#2 - This code is saving the full path of all the images. We will need this later
All other parts of the code is quite trivial and self-explanatory.
# Load as numpy array
from tensorflow.keras.preprocessing.image import load_img, img_to_array

dataset = np.empty(shape=(len(all_images),128,128,3)) #1

for i,path in enumerate(all_images):  #2
    img = load_img(path, target_size=(128,128))
    img_arr = img_to_array(img)
    dataset[i] = img_arr

np.random.shuffle(dataset) #3

dataset.shape
Code-explanation
#1 - Creating a blank numpy array of size equal to all the images
#2 - Loading all the images and saving it as numpy array
#3 - Since, we read the file sequentially from each Category folder. So it is not shuffled by Default. So we did it explicitly.
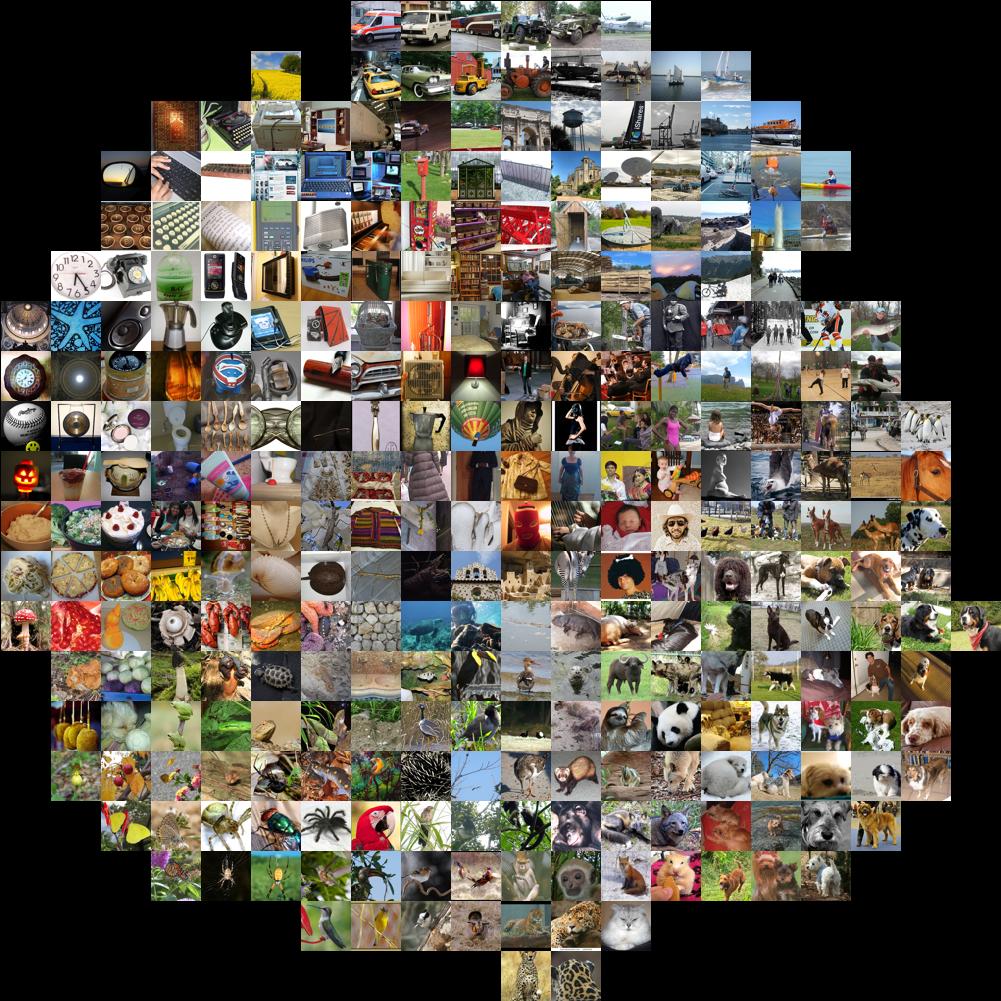
# View some images
rand_id = np.random.randint(0,len(all_images),5)

_,ax = plt.subplots(1,5,figsize=(15,4))

for i,id in enumerate(rand_id):
    #img = plt.imread(all_images[id],)
    img = dataset[id]/255.
    ax[i].imshow(img)

# Keep 5% images for search
x_train = dataset[:8000]
x_test = dataset[8000:]
Code-explanation
We have randomly picked 5 images and displayed it
Result
# Build the Feature extractor model
from tensorflow import keras
from keras.applications.resnet50 import ResNet50, preprocess_input

input = keras.layers.Input(shape=(128,128,3))
model = keras.layers.Lambda(lambda x: preprocess_input(x))(input) #1
model = ResNet50(weights='imagenet', include_top=False)(model) #2

model = keras.Model(inputs=input, outputs=model)

model.summary()
Code-explanation
#1 - A lambda layer to pass each image through ResNet50 pre-processing function
#2 - Loading the ResNet50 without the top Dense layers. We only need the features. So, top is excluded
# Extract the the embeddings
train_embedding = model.predict(x_train) #1
train_embedding = np.average(train_embedding, axis=(1,2)) #2
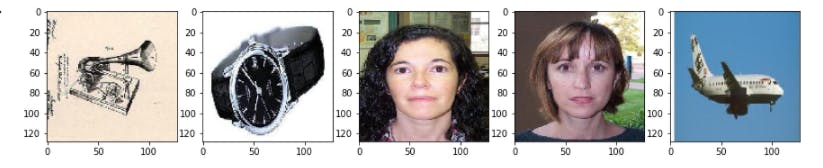
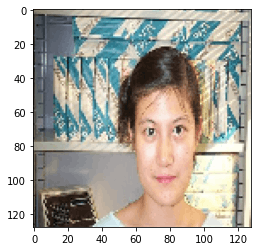
# Pick a random test image #3
rand_id = np.random.randint(0,x_test.shape[0],1)
data = x_test[rand_id]
embedding = np.average(model.predict(data), axis=(1,2))
plt.imshow(data[0]/255.)
Code-explanation
#1 - We got the Features for all images with the predict function of the model
#2 - Each feature has a 4x4 shape. We average these 16 values for each features
#3 - Pick a random test image(Our search image). Calculate its embedding. Display the image
Result
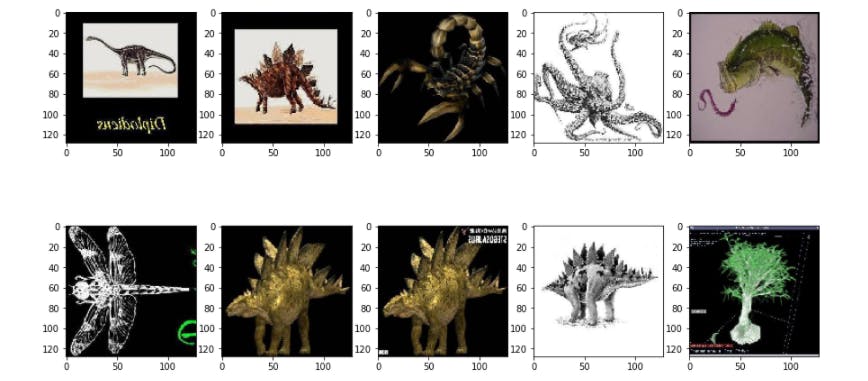
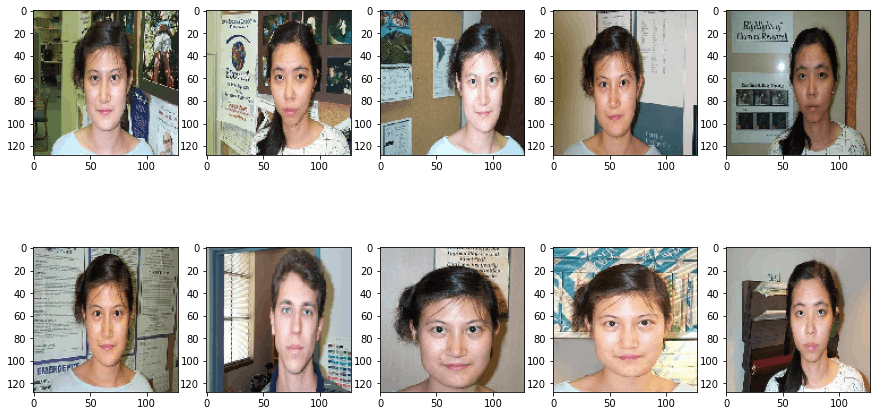
# Calculate the Eucledean distance for the test embedding from all the train embeddings
eucledean_distance = np.array([np.linalg.norm(embedding[0]-elem) for elem in train_embedding]) #1

# Get the nearest 10, these are our search results
top_10 = eucledean_distance.argsort()[:10] #2
search = x_train[top_10] #3

# View search results  #4
_,ax = plt.subplots(2,5,figsize=(15,8))

for i,arr in enumerate(search):
    #img = plt.imread(all_images[id],)
    img = arr/255.
    ax[i//5][i%5].imshow(img)
Code-explanation
#1 - Calculate the Euclidean distance of the search image with all the train image
#2 - Get the index of 10 lowest values i.e. nearest images. We will use this index to get the image from train dataset
#3 - Get the matching images from the train set using the above index
#4 - Display the matching imagesResult
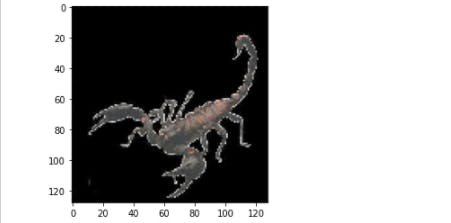
Let's check another image
Search Image
 Search results
Conclusions
We observed that a very simple code was able to identify very close matches esp. the second example where faces of the same person were identified.
We must give the due credit to the power of the pre-trained model. The ResNet50 pre-trained model was the backbone of our code.
Another aspect is the Euclidean distance. Be mindful that we need to calculate the distance of the test image with all the train image. We may define the centre of different clusters among the train images and quickly check the nearest centre for the test image and pick the result from that cluster only.
Taking it forward,
- You can try this on another dataset e.g. ImageNet
- Try reducing the dimension of extracted features using PCA and see the results. The current dimension is 2048 which is the Feature maps count of ResNet50.
- Try adding a fancy UI to send an image and display the responses. This can be a simple demonstration project.